Now, instead of displaying the contact form directly, we provide an option for you to hide it behind a sleek "Contact Us" button. This means that shoppers will now explore your Order Management and Multi-Flows first, empowering them to find solutions on their own. When they still need help, they can easily access the contact form with a simple click.
If you’re creating a contact form for the first time, your newly created Contact Form will automatically adopt this new display layout.
For your existing Contact Form, you can easily switch to the new layout by checking the Expand Contact Form feature in Settings > Contact Form > Customization.
This strategic change encourages shoppers to explore before reaching out for assistance, significantly reducing the number of tickets you receive. It's a win-win for everyone!
ℹ️ Just a friendly reminder: This new display option will only be available for merchants with Order Management Flows or Multi-Flows enabled.
With this feature, every visitor can unlock a personalized discount code tailored to your campaign settings. You can easily track the number of redeemed codes and monitor conversions to drive more revenue.
Since our unique discount code expires in 48 hours, you don't have to worry about it ending up on any discount sharing websites.
To get started, simply create a unique discount offer. It could be a fixed amount, a percentage off, or free shipping. Set the value, and attach it to your campaign. Let's start boosting your sales today!
]]>With this feature, every visitor can unlock a personalized discount code tailored to your campaign settings. You can easily track the number of redeemed codes and monitor conversions to drive more revenue.
Since our unique discount code expires in 48 hours, you don't have to worry about it ending up on any discount sharing websites.
To get started, simply create a unique discount offer. It could be a fixed amount, a percentage off, or free shipping. Set the value, and attach it to your campaign. Let's start boosting your sales today!
]]>Handling calls can become a bottleneck, as one agent can only handle one customer at a time. Many customers may not realize they can text your business instead, so make sure to highlight this option for them directly in your IVR setup!
What is the caller experience?
The caller will hear they can be contacted via SMS instead
A confirmation message will be played that indicates their request is being handled
The shopper receives a customizable SMS message they can then reply to
How to get started?
To set this up, visit your IVR integration’s settings page. A new type of Menu option is allowed if you have SMS integrations configured: Send call to SMS.
You can then configure the confirmation message the callers will hear, as well as the outbound SMS message text they will receive once the SMS menu is selected. A new SMS ticket will be created in your Helpdesk and your agents can handle shopper inquires via text.
]]>
Previously, only a single TikTok Shop or WooCommerce account could be integrated within Gorgias.
We’ve now added the ability to connect (and disconnect) multiple accounts independently, allowing you to manage more of your support workflow through Gorgias.
To add additional accounts, visit the Accounts tab in the TikTok Shop and WooCommerce settings pages and select the new Add Account button.
Note: To disconnect the TikTok Shop or WooCommerce app after all of the individual integrations have been disconnected.
Once you’ve had a chance to connect all of your accounts, let us know what you think by emailing us at [email protected] or via chat.
]]>Previously, only a single TikTok Shop or WooCommerce account could be integrated within Gorgias.
We’ve now added the ability to connect (and disconnect) multiple accounts independently, allowing you to manage more of your support workflow through Gorgias.
To add additional accounts, visit the Accounts tab in the TikTok Shop and WooCommerce settings pages and select the new Add Account button.
Note: To disconnect the TikTok Shop or WooCommerce app after all of the individual integrations have been disconnected.
Once you’ve had a chance to connect all of your accounts, let us know what you think by emailing us at [email protected] or via chat.
]]>AI can now save you hours when creating or updating your Help Center by drafting content based on your unique customer interactions.
How does AI generate Help Center content?
AI studies your account’s past interactions to understand your most common questions. Then, it drafts articles based on how you responded to those questions.
You can see the number of tickets that inspired each AI-generated article to understand how impactful the article will be.
AI-generated content is unique to your account — data between accounts is not shared.
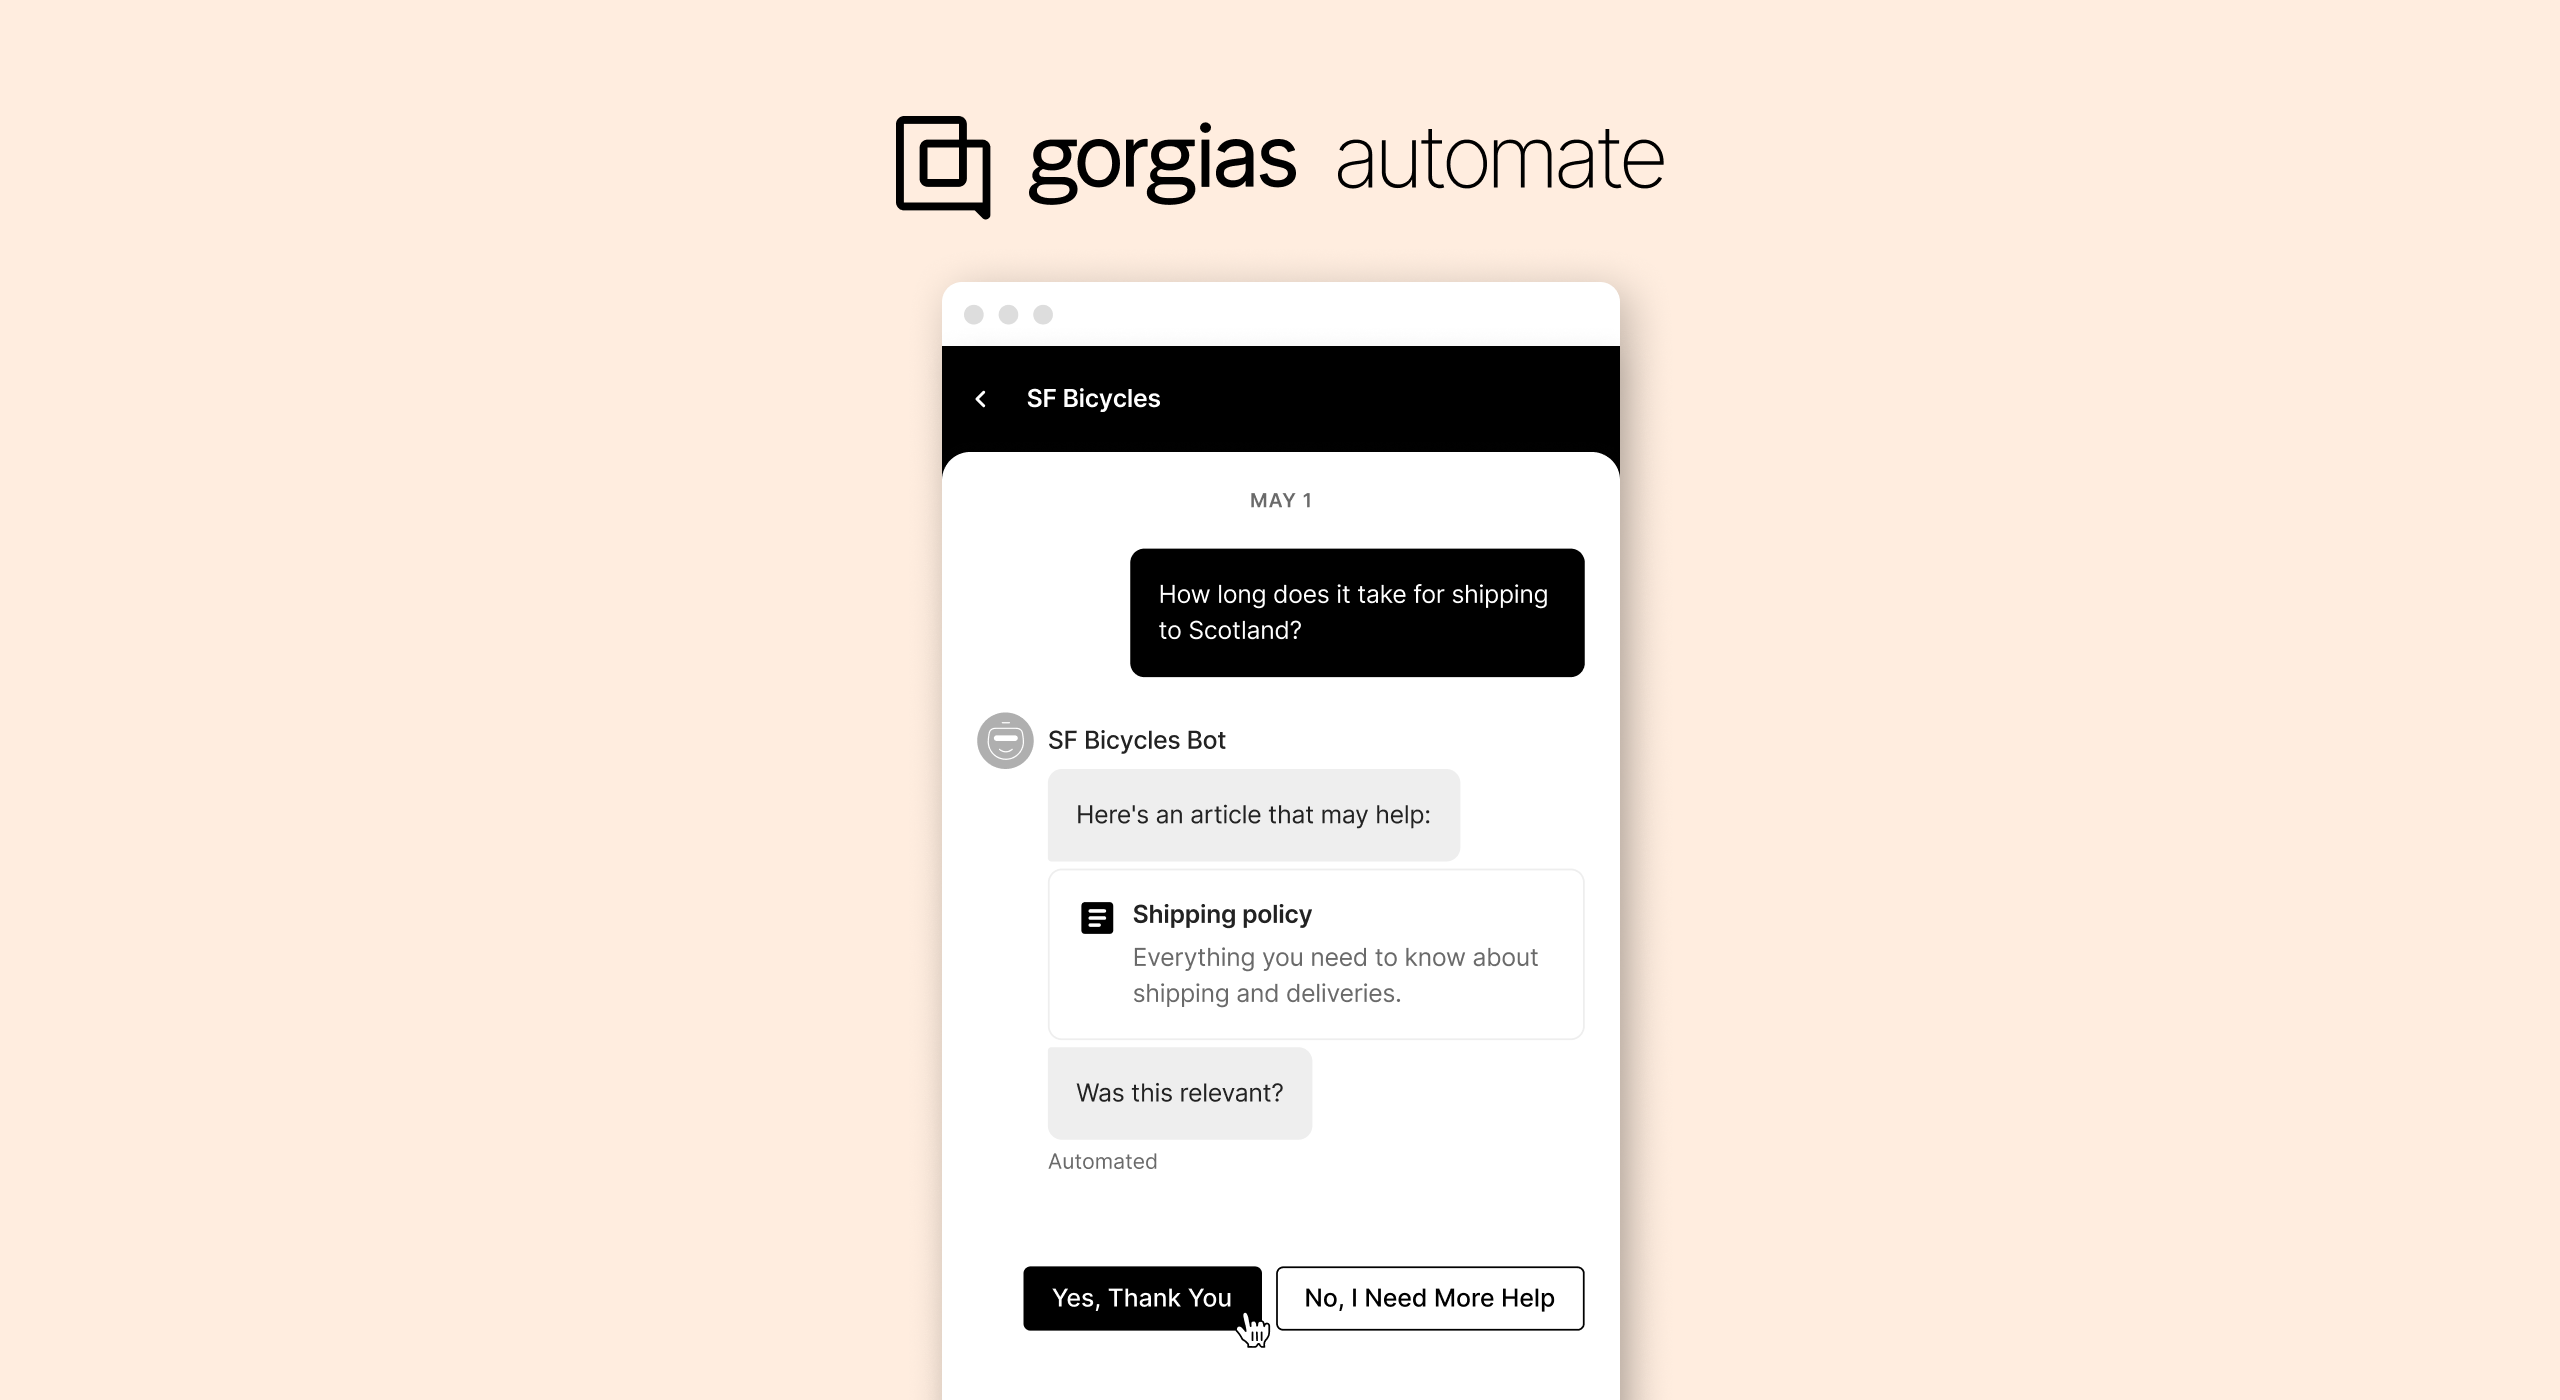
If you’re an Automate subscriber, populating your Help Center with content is a great way to take advantage of Article Recommendations (and other upcoming AI features… 👀) to resolve even more customer interactions without any wait time or agent effort.
How do I see my AI-generated Help Center content?
AI-generated content is available in a couple of places throughout Gorgias, depending on whether you already have a Help Center or need to create one.
If you don’t have a Help Center yet
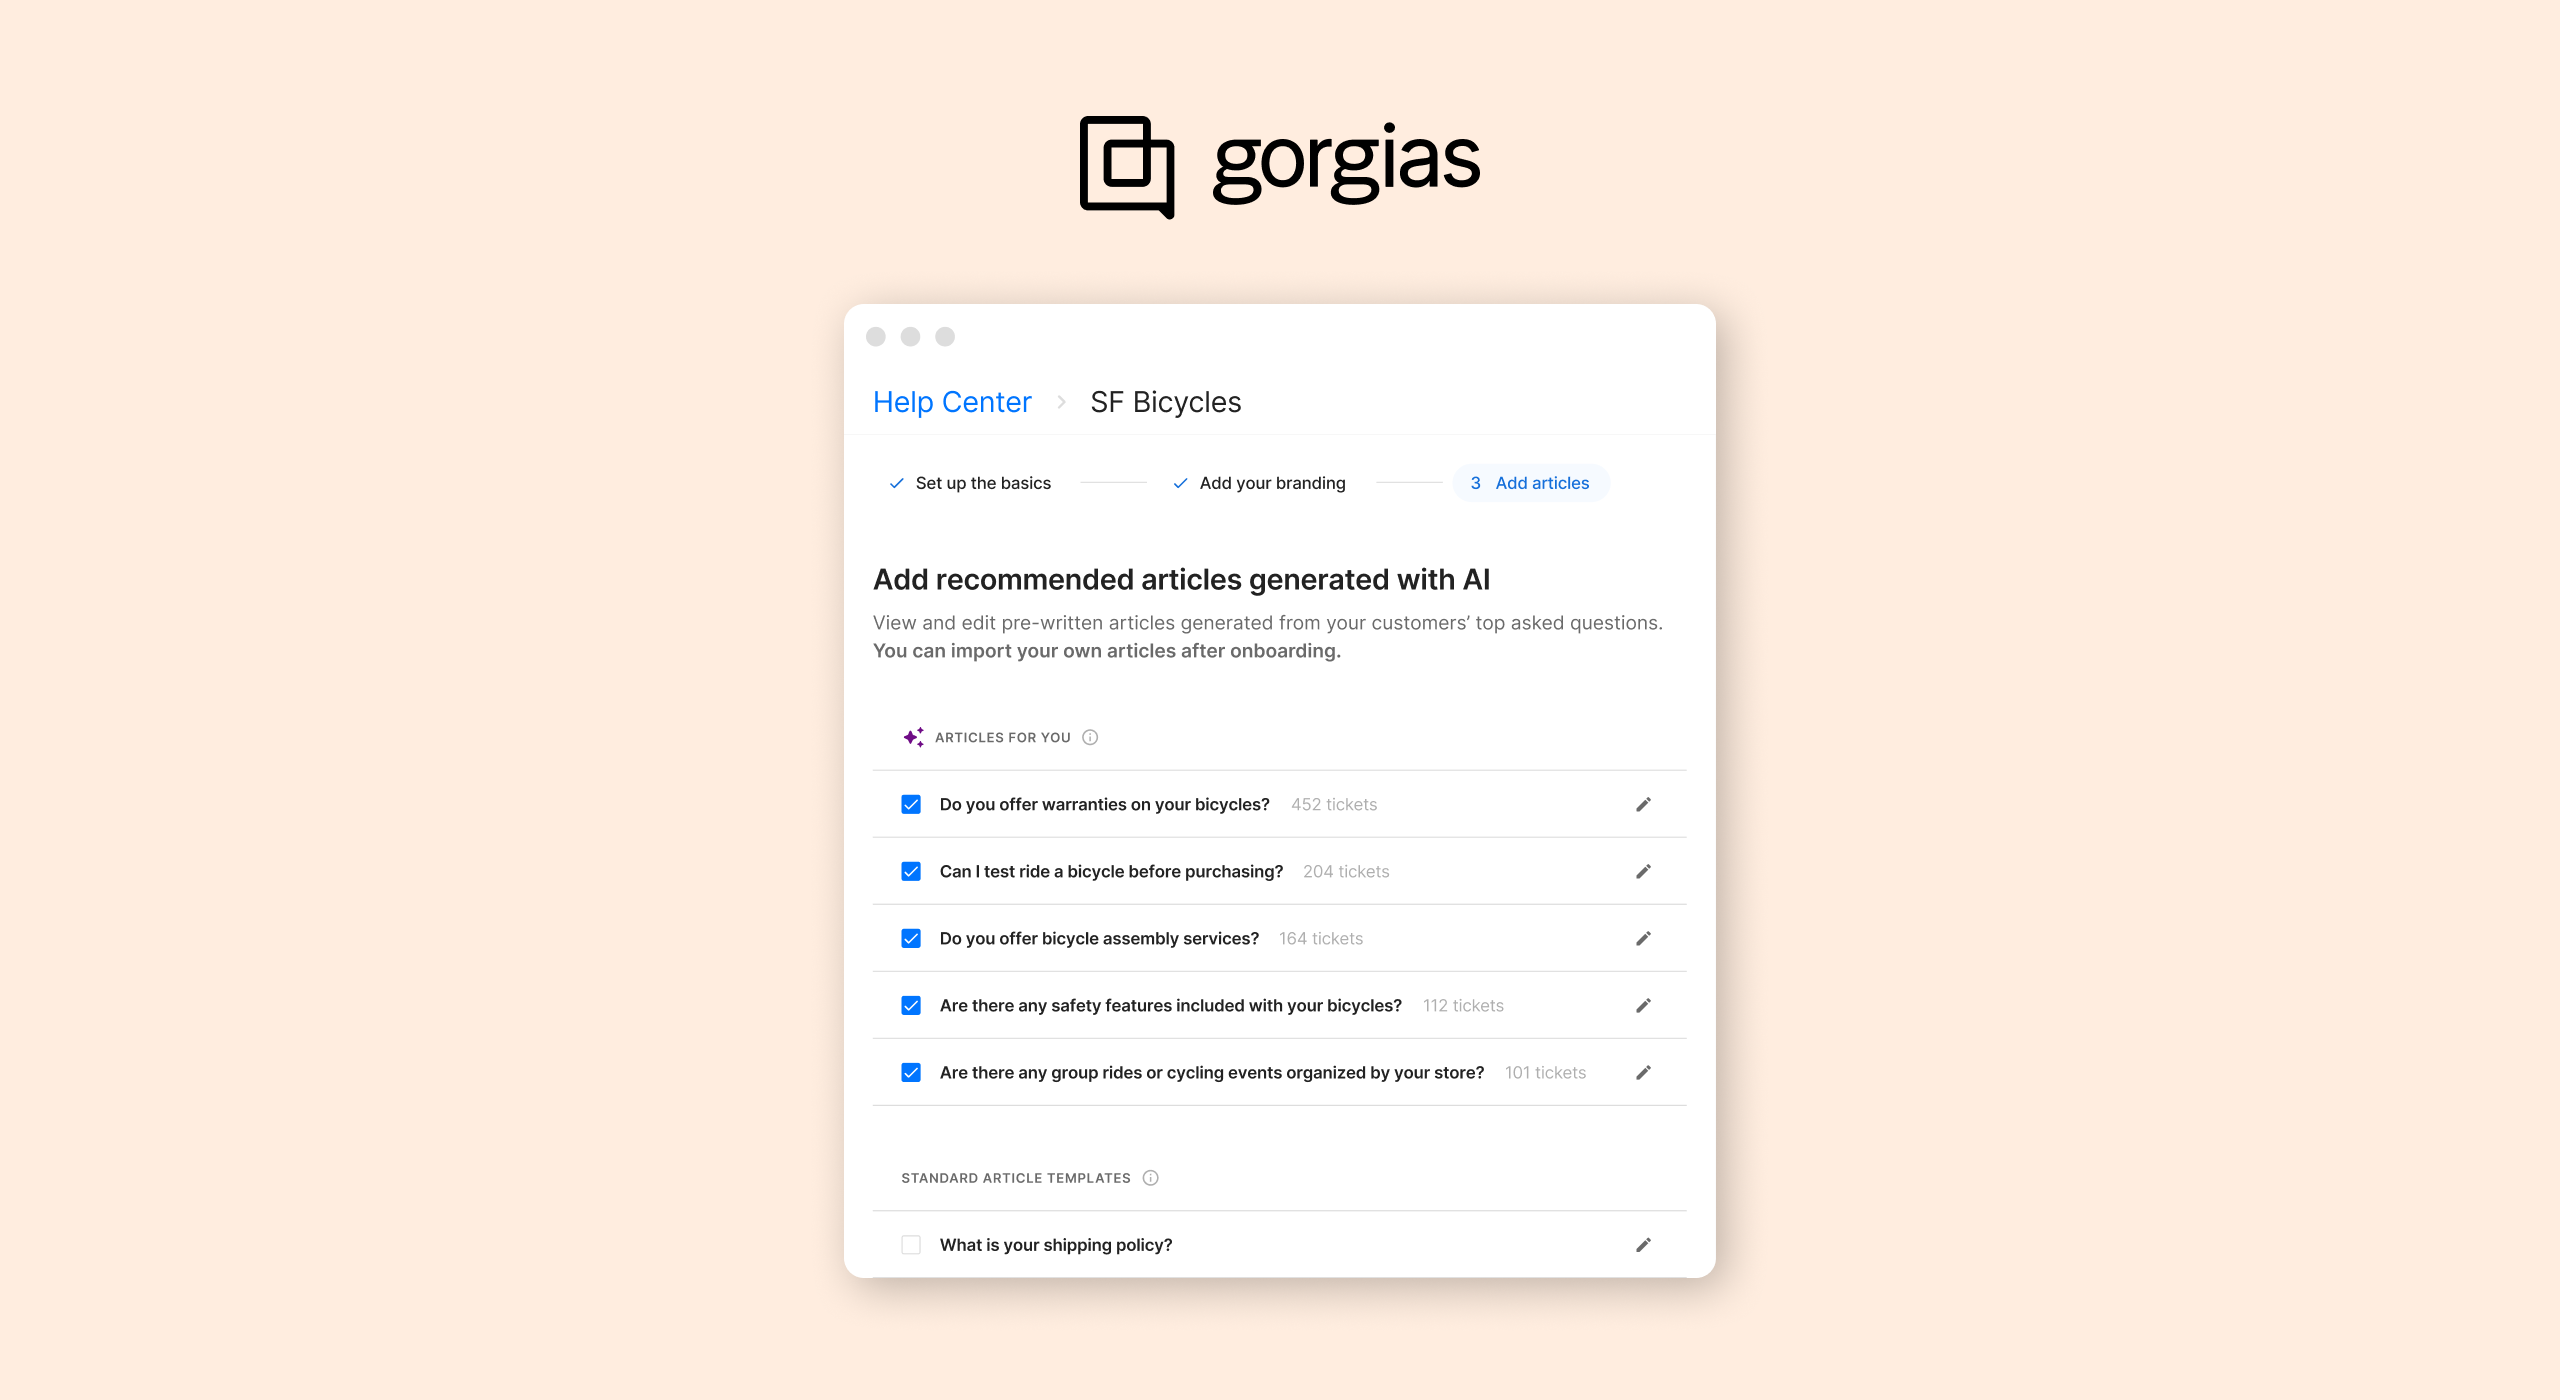
If you don’t have a Help Center, you can set one up with our easy step-by-step wizard. Simply head to Settings > Help Center and click Create Help Center. Your AI-generated articles will be waiting for you in the setup experience.
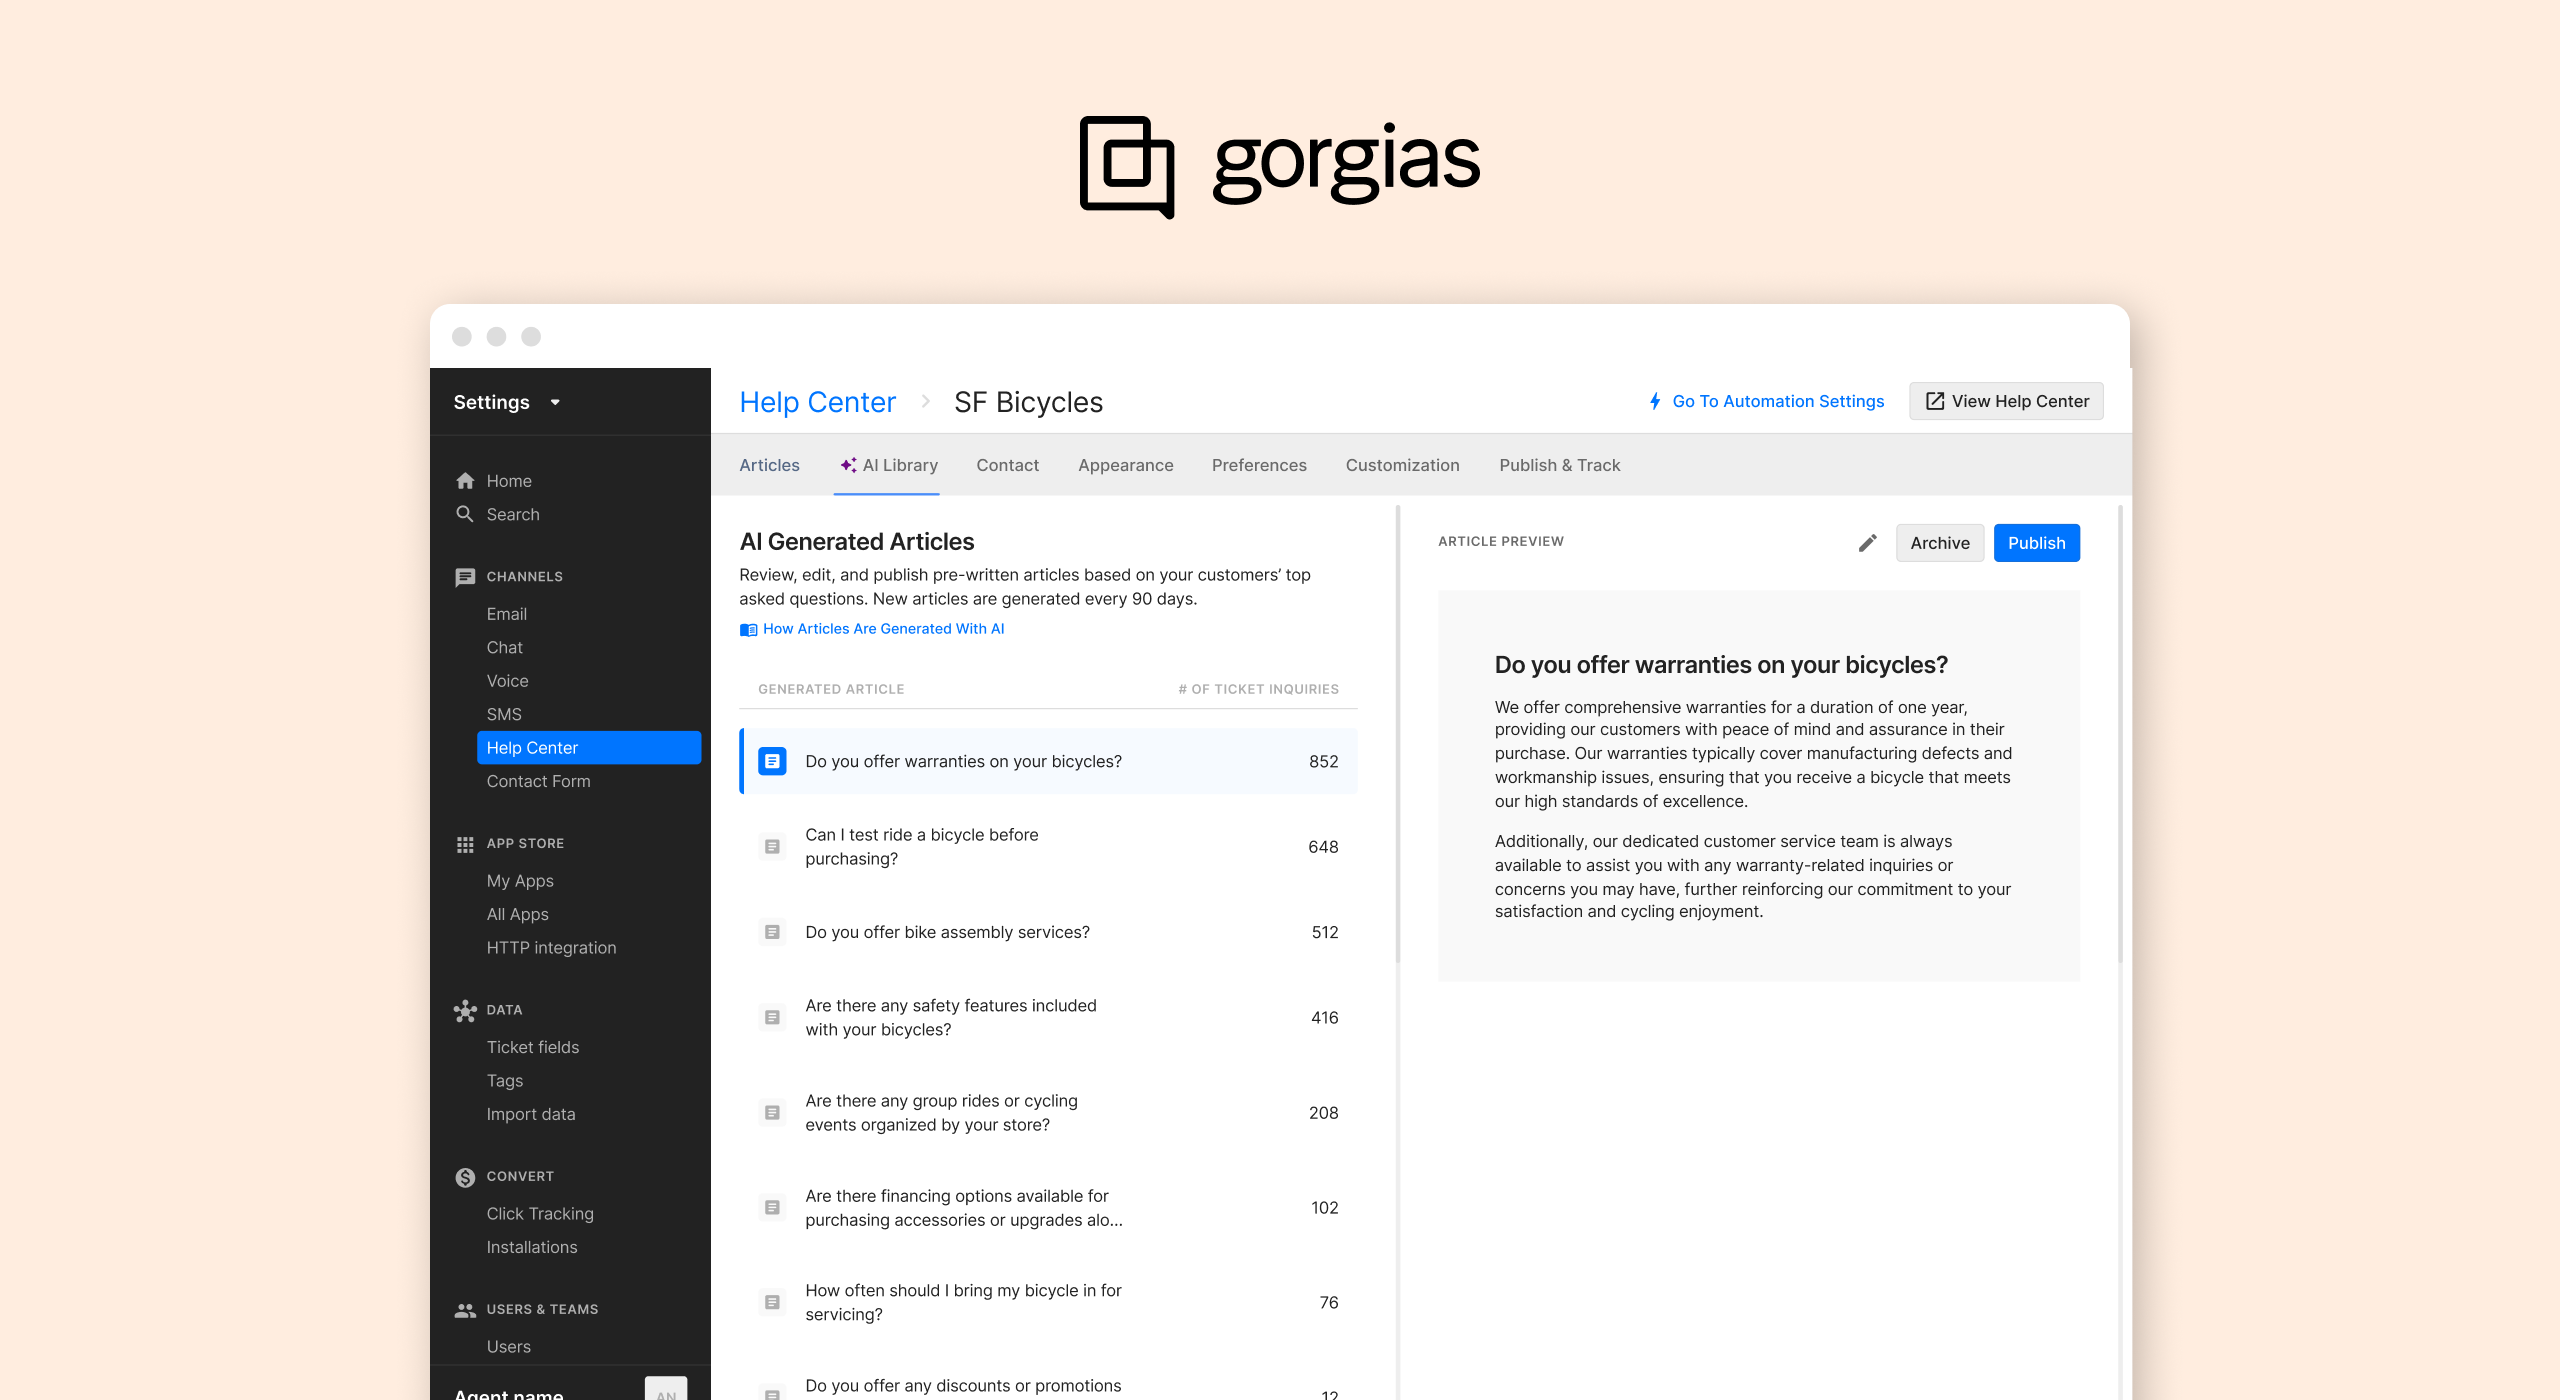
If you already have a Help Center
If you already have a Help Center, you’ll find a new ✨ AI Library tab in your Help Center’s settings. Inside, you’ll find AI-generated articles unique to your account.
Of course, you can edit each article before adding it to your Help Center to ensure it perfectly matches your policies and brand voice.
Who can access AI-generated content?
To access AI-generated content, you must fit a few criteria:
Have exactly one active Shopify integration in your Gorgias account (support for multi-store brands is coming soon)
Have a Help Center with English (US or UK) as the default language
Be in an English-speaking country
Be your account’s Owner, Admin, or Lead Agent
Have at least 100 Helpdesk tickets in the last 90 days (not counting Chat or spam tickets)
Did not opt out of 3rd-party data sharing
If you are not eligible for this feature but would find it useful, please request this feature from our product team.
How often will AI generate content (and how will I know)?
We generate content weekly, for any account that matches the above criteria and hasn’t had any AI-generated articles in the last few months. If you meet the criteria listed above, you should receive AI-generated every 3-6 months, depending on your account’s side.
You will receive an email and notifications in Gorgias when AI-generated articles are available in your account.
If you have trouble, check out our support articles for adding AI Articles to new Help Centers or existing Help Centers.
We hope this update helps you build out your Help Center in a fraction of the time. Check it out and let us know what you think!
]]>AI can now save you hours when creating or updating your Help Center by drafting content based on your unique customer interactions.
How does AI generate Help Center content?
AI studies your account’s past interactions to understand your most common questions. Then, it drafts articles based on how you responded to those questions.
You can see the number of tickets that inspired each AI-generated article to understand how impactful the article will be.
AI-generated content is unique to your account — data between accounts is not shared.
If you’re an Automate subscriber, populating your Help Center with content is a great way to take advantage of Article Recommendations (and other upcoming AI features… 👀) to resolve even more customer interactions without any wait time or agent effort.
How do I see my AI-generated Help Center content?
AI-generated content is available in a couple of places throughout Gorgias, depending on whether you already have a Help Center or need to create one.
If you don’t have a Help Center yet
If you don’t have a Help Center, you can set one up with our easy step-by-step wizard. Simply head to Settings > Help Center and click Create Help Center. Your AI-generated articles will be waiting for you in the setup experience.
If you already have a Help Center
If you already have a Help Center, you’ll find a new ✨ AI Library tab in your Help Center’s settings. Inside, you’ll find AI-generated articles unique to your account.
Of course, you can edit each article before adding it to your Help Center to ensure it perfectly matches your policies and brand voice.
Who can access AI-generated content?
To access AI-generated content, you must fit a few criteria:
Have exactly one active Shopify integration in your Gorgias account (support for multi-store brands is coming soon)
Have a Help Center with English (US or UK) as the default language
Be in an English-speaking country
Be your account’s Owner, Admin, or Lead Agent
Have at least 100 Helpdesk tickets in the last 90 days (not counting Chat or spam tickets)
Did not opt out of 3rd-party data sharing
If you are not eligible for this feature but would find it useful, please request this feature from our product team.
How often will AI generate content (and how will I know)?
We generate content weekly, for any account that matches the above criteria and hasn’t had any AI-generated articles in the last few months. If you meet the criteria listed above, you should receive AI-generated every 3-6 months, depending on your account’s side.
You will receive an email and notifications in Gorgias when AI-generated articles are available in your account.
If you have trouble, check out our support articles for adding AI Articles to new Help Centers or existing Help Centers.
We hope this update helps you build out your Help Center in a fraction of the time. Check it out and let us know what you think!
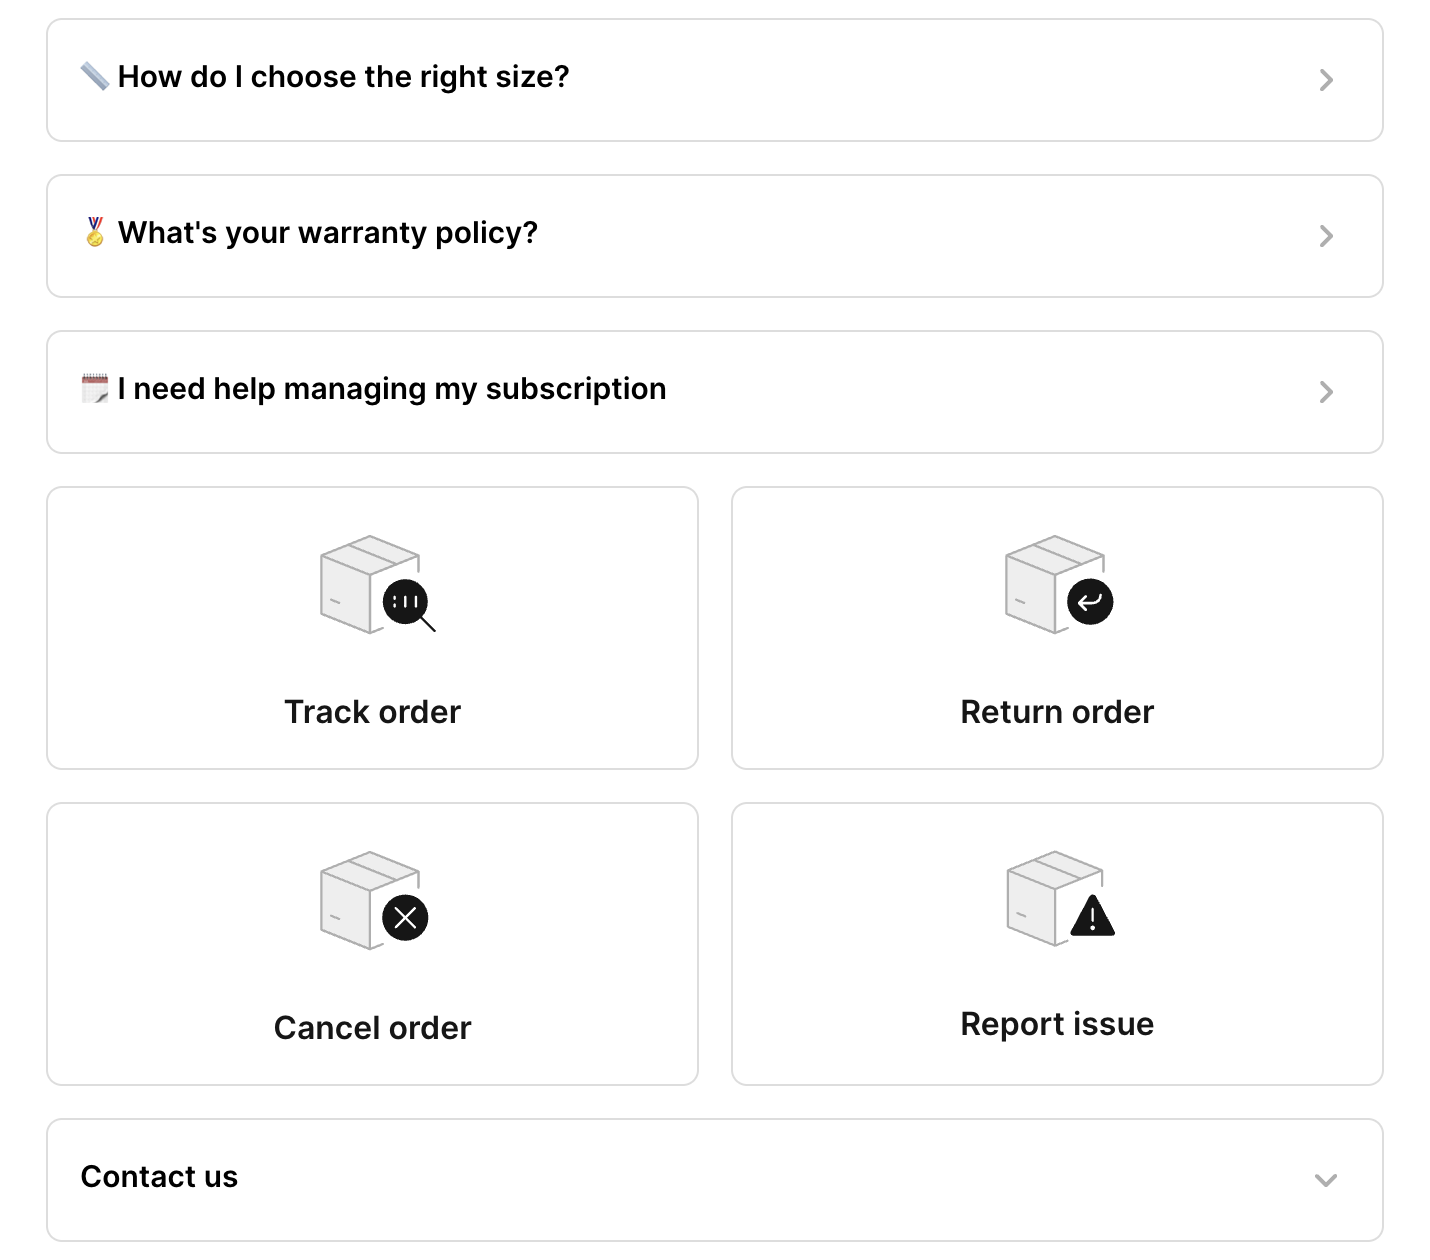
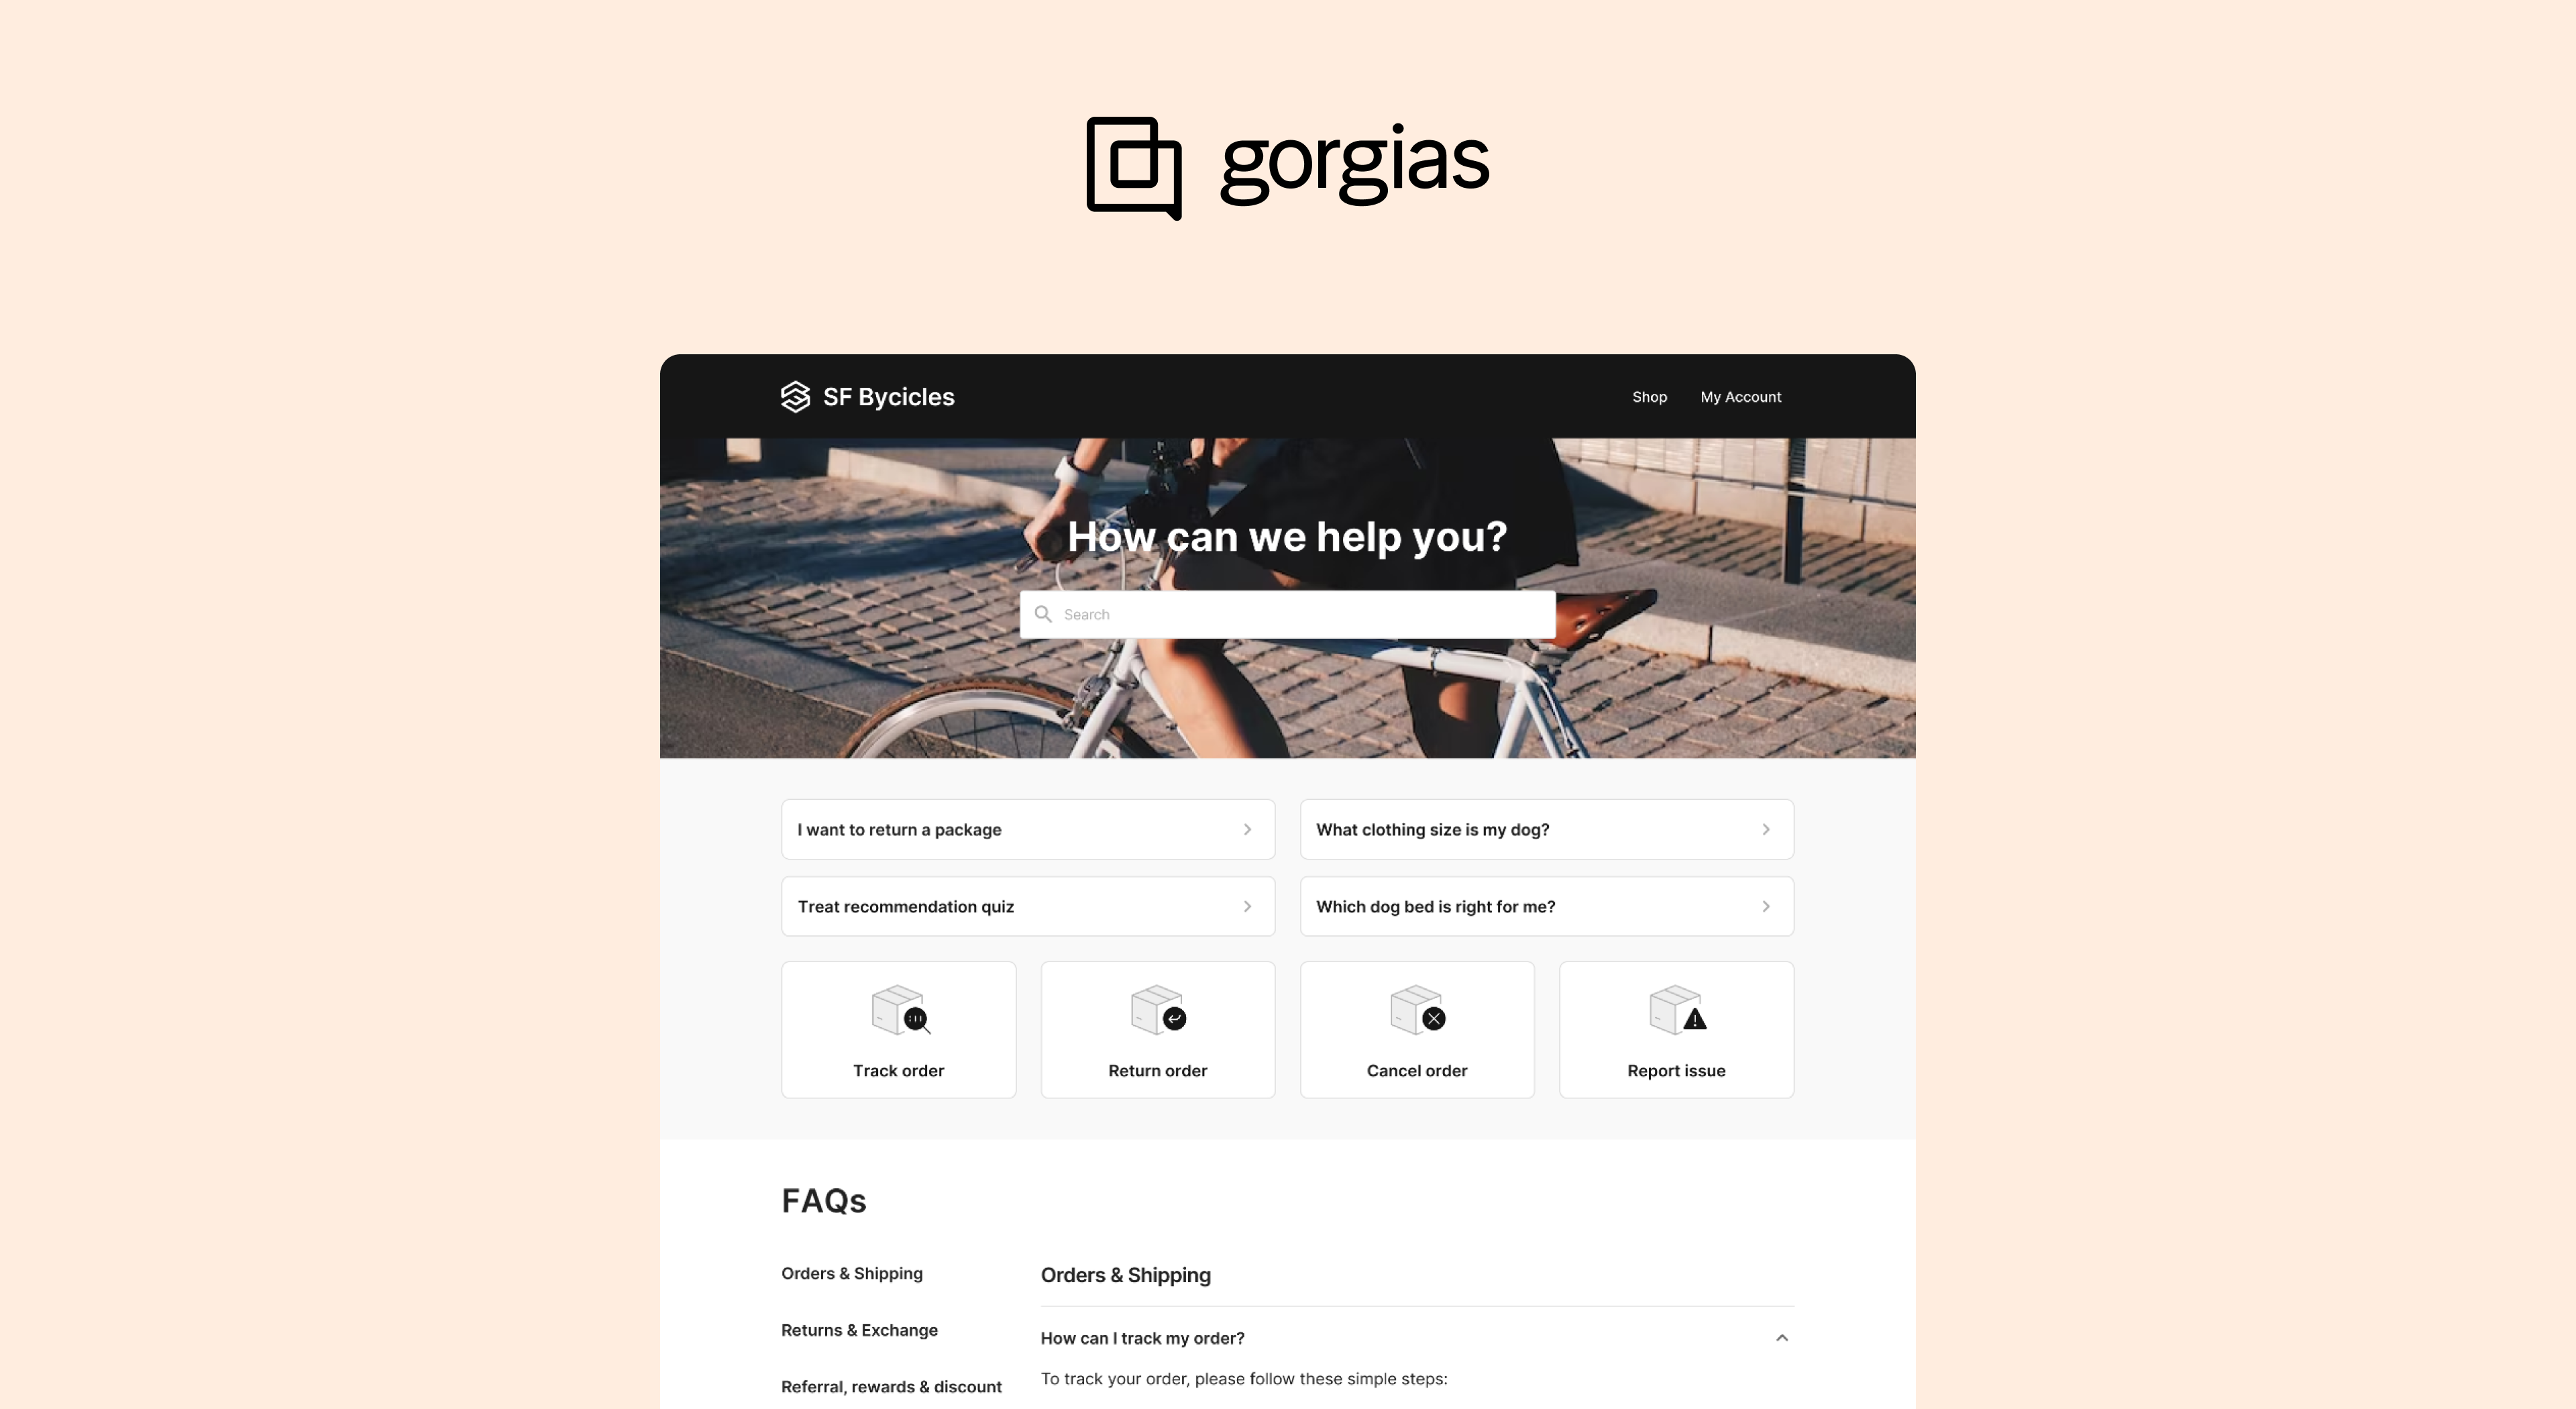
]]>Take a look at the new one-page layout, which features toggles and a static table of contents:
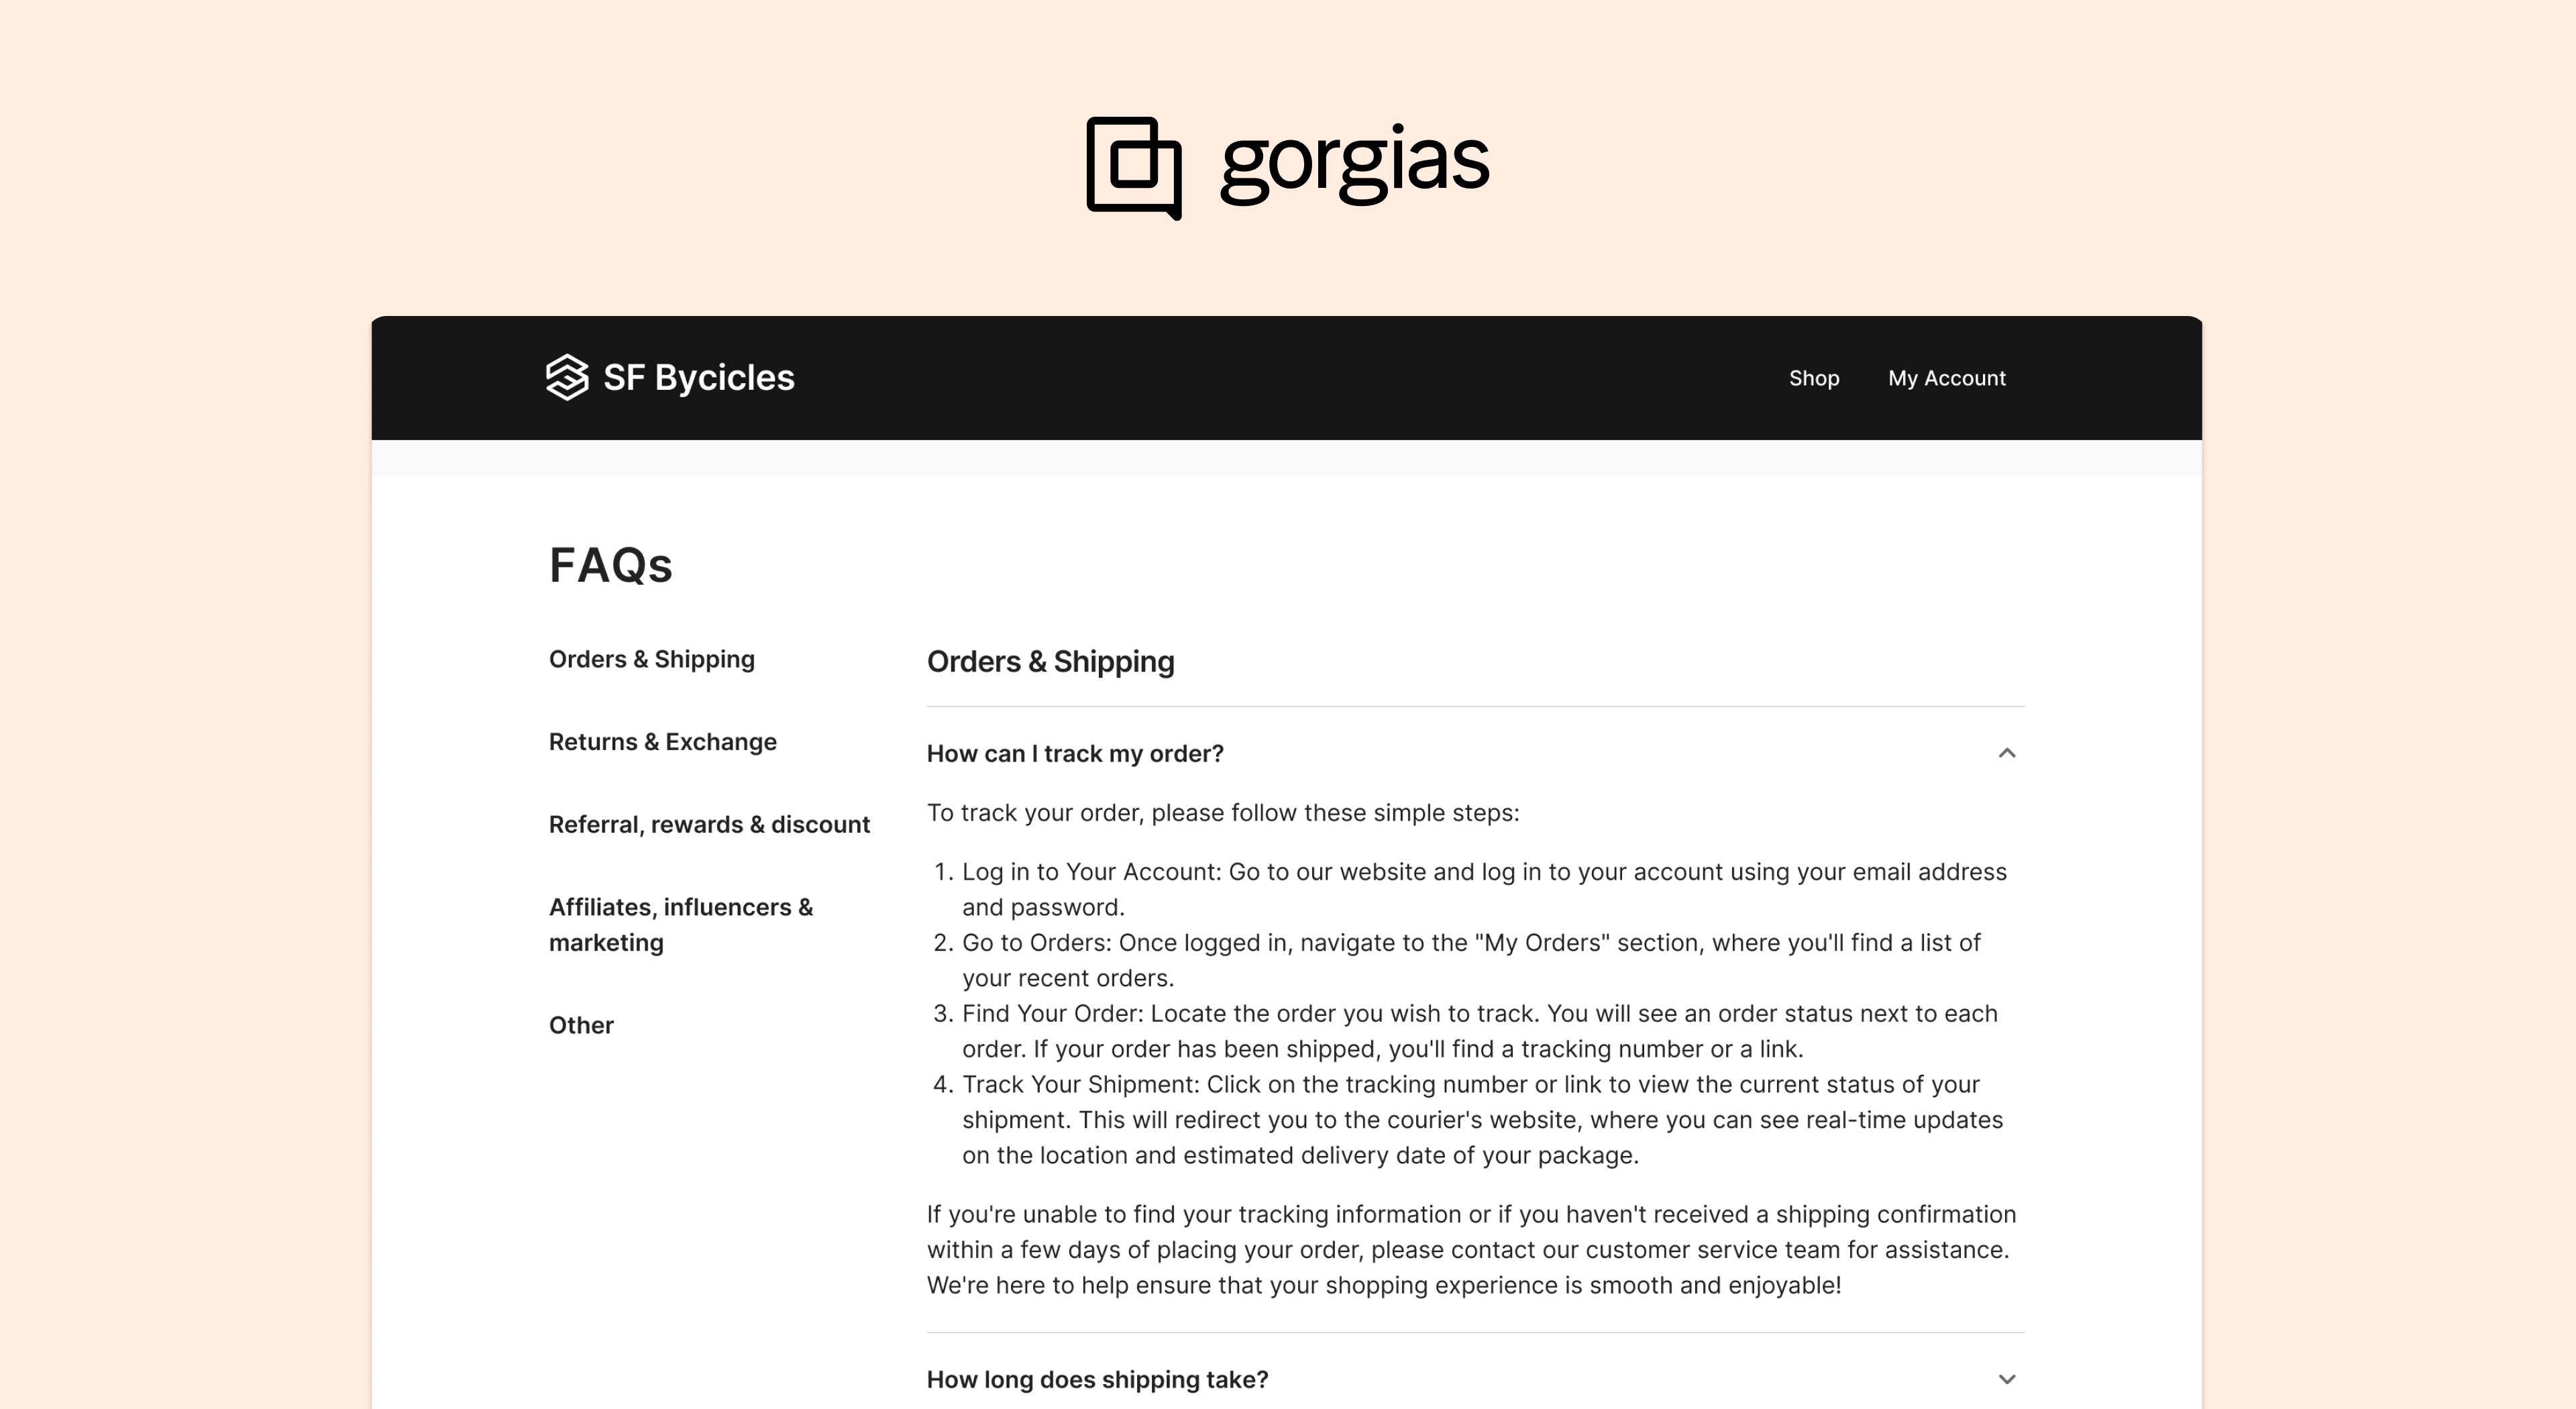
And of course, Automate subscribers can still display Flows and Order Management at the top of the Help Center, to let customers easily answer FAQs and track and manage orders via self-service.
If you’re creating a Help Center for the first time, you’ll have the option to choose between the one-page or card layout in the convenient setup wizard.
If you already have a Help Center, head to Settings > Help Center > Appearance to switch your layout at any time.
We’re always aiming to make our solutions more flexible and customizable to give you control over how your brand shows up for your customers. Give the one-page Help Center a try and let us know what you think!
]]>Take a look at the new one-page layout, which features toggles and a static table of contents:
And of course, Automate subscribers can still display Flows and Order Management at the top of the Help Center, to let customers easily answer FAQs and track and manage orders via self-service.
If you’re creating a Help Center for the first time, you’ll have the option to choose between the one-page or card layout in the convenient setup wizard.
If you already have a Help Center, head to Settings > Help Center > Appearance to switch your layout at any time.
We’re always aiming to make our solutions more flexible and customizable to give you control over how your brand shows up for your customers. Give the one-page Help Center a try and let us know what you think!
]]>
How to get started
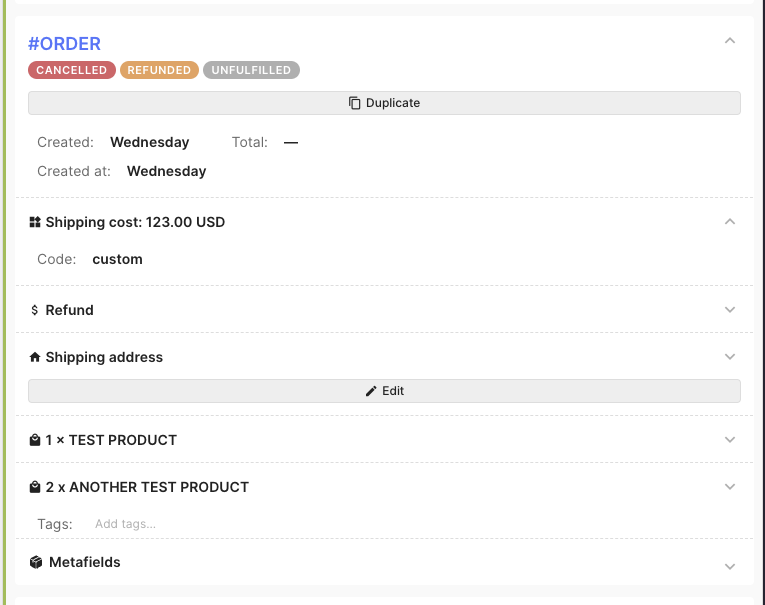
In the Shopify widget on a ticket or a customer profile, find and open any order
Search for the order field titled Metafields at the bottom of the order
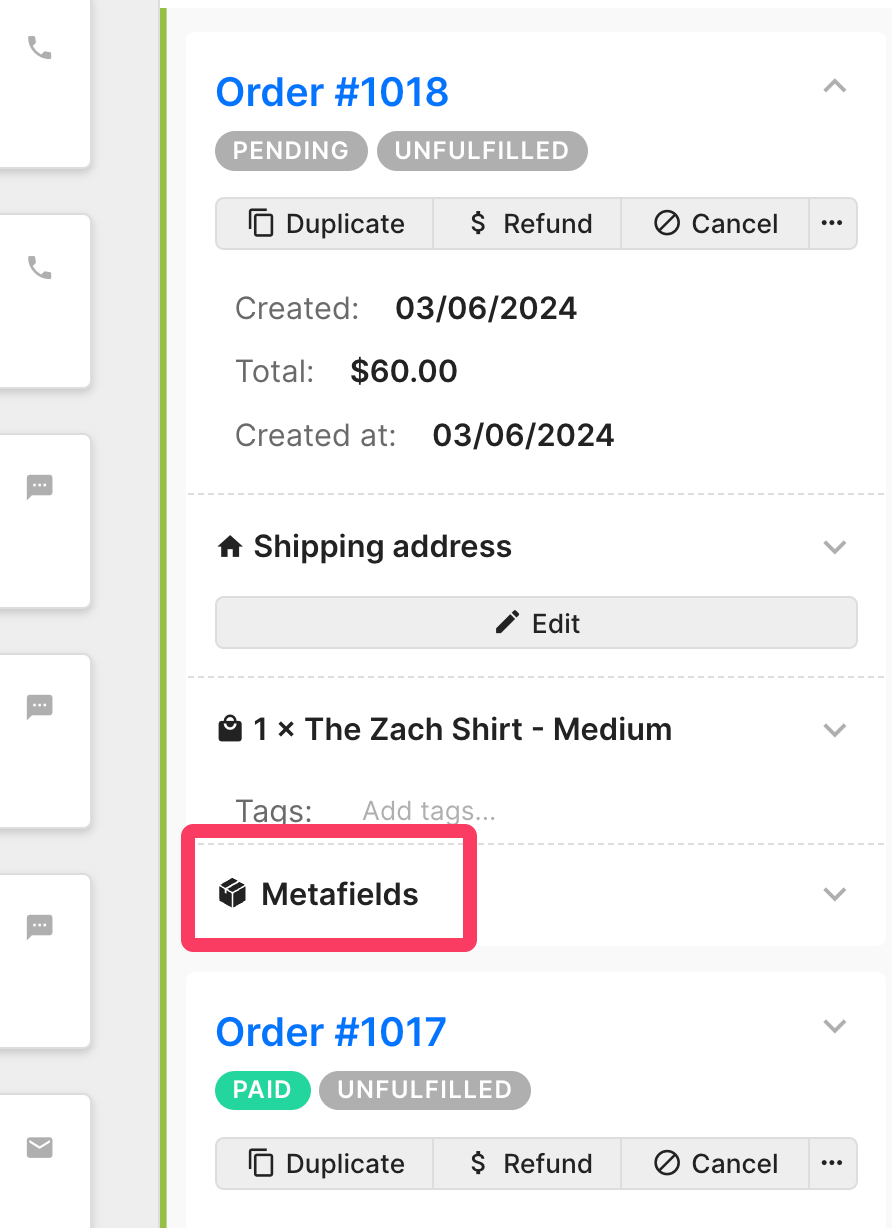
Open the Metafields section by clicking the uncollapse icon.
If the customer’s order has any metafields populated, they will be loaded. Otherwise, you will see the following message: “Order has no metafields populated”
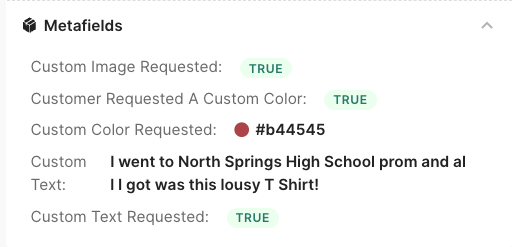
Once you have had a chance to try out our new Order Metafields feature, let us know what you think by emailing us at [email protected] or reaching out to us via the chat!
To find additional details, kindly refer to our help documentation.
]]>How to get started
In the Shopify widget on a ticket or a customer profile, find and open any order
Search for the order field titled Metafields at the bottom of the order
Open the Metafields section by clicking the uncollapse icon.
If the customer’s order has any metafields populated, they will be loaded. Otherwise, you will see the following message: “Order has no metafields populated”
Once you have had a chance to try out our new Order Metafields feature, let us know what you think by emailing us at [email protected] or reaching out to us via the chat!
To find additional details, kindly refer to our help documentation.
]]>Support Performance Overview Report
Ticket Handle Time
Ticket Handle Time (THT), also known as Average Handle Time (AHT), is a vital metric that measures the average time your agents spend resolving a ticket. This metric provides valuable insights into your agents' efficiency and enables you to effectively forecast the necessary agent count to manage your ticket volume. Analyzing Ticket Handle Time allows you to optimize operational efficiency, enhance response times, and deliver exceptional customer experiences.
You can find these metrics both in the Support Performance Overview and the Agents reports.
Support Performance Agents report
Online Time
Exciting news! We've revamped the way we track the time spent by agents in Gorgias. While this metric was previously available only in the Live Agents report and couldn't be analyzed over different periods. However, it's now been completely reworked for better accuracy. This enhancement empowers you to assess your agents' performance more effectively over time.
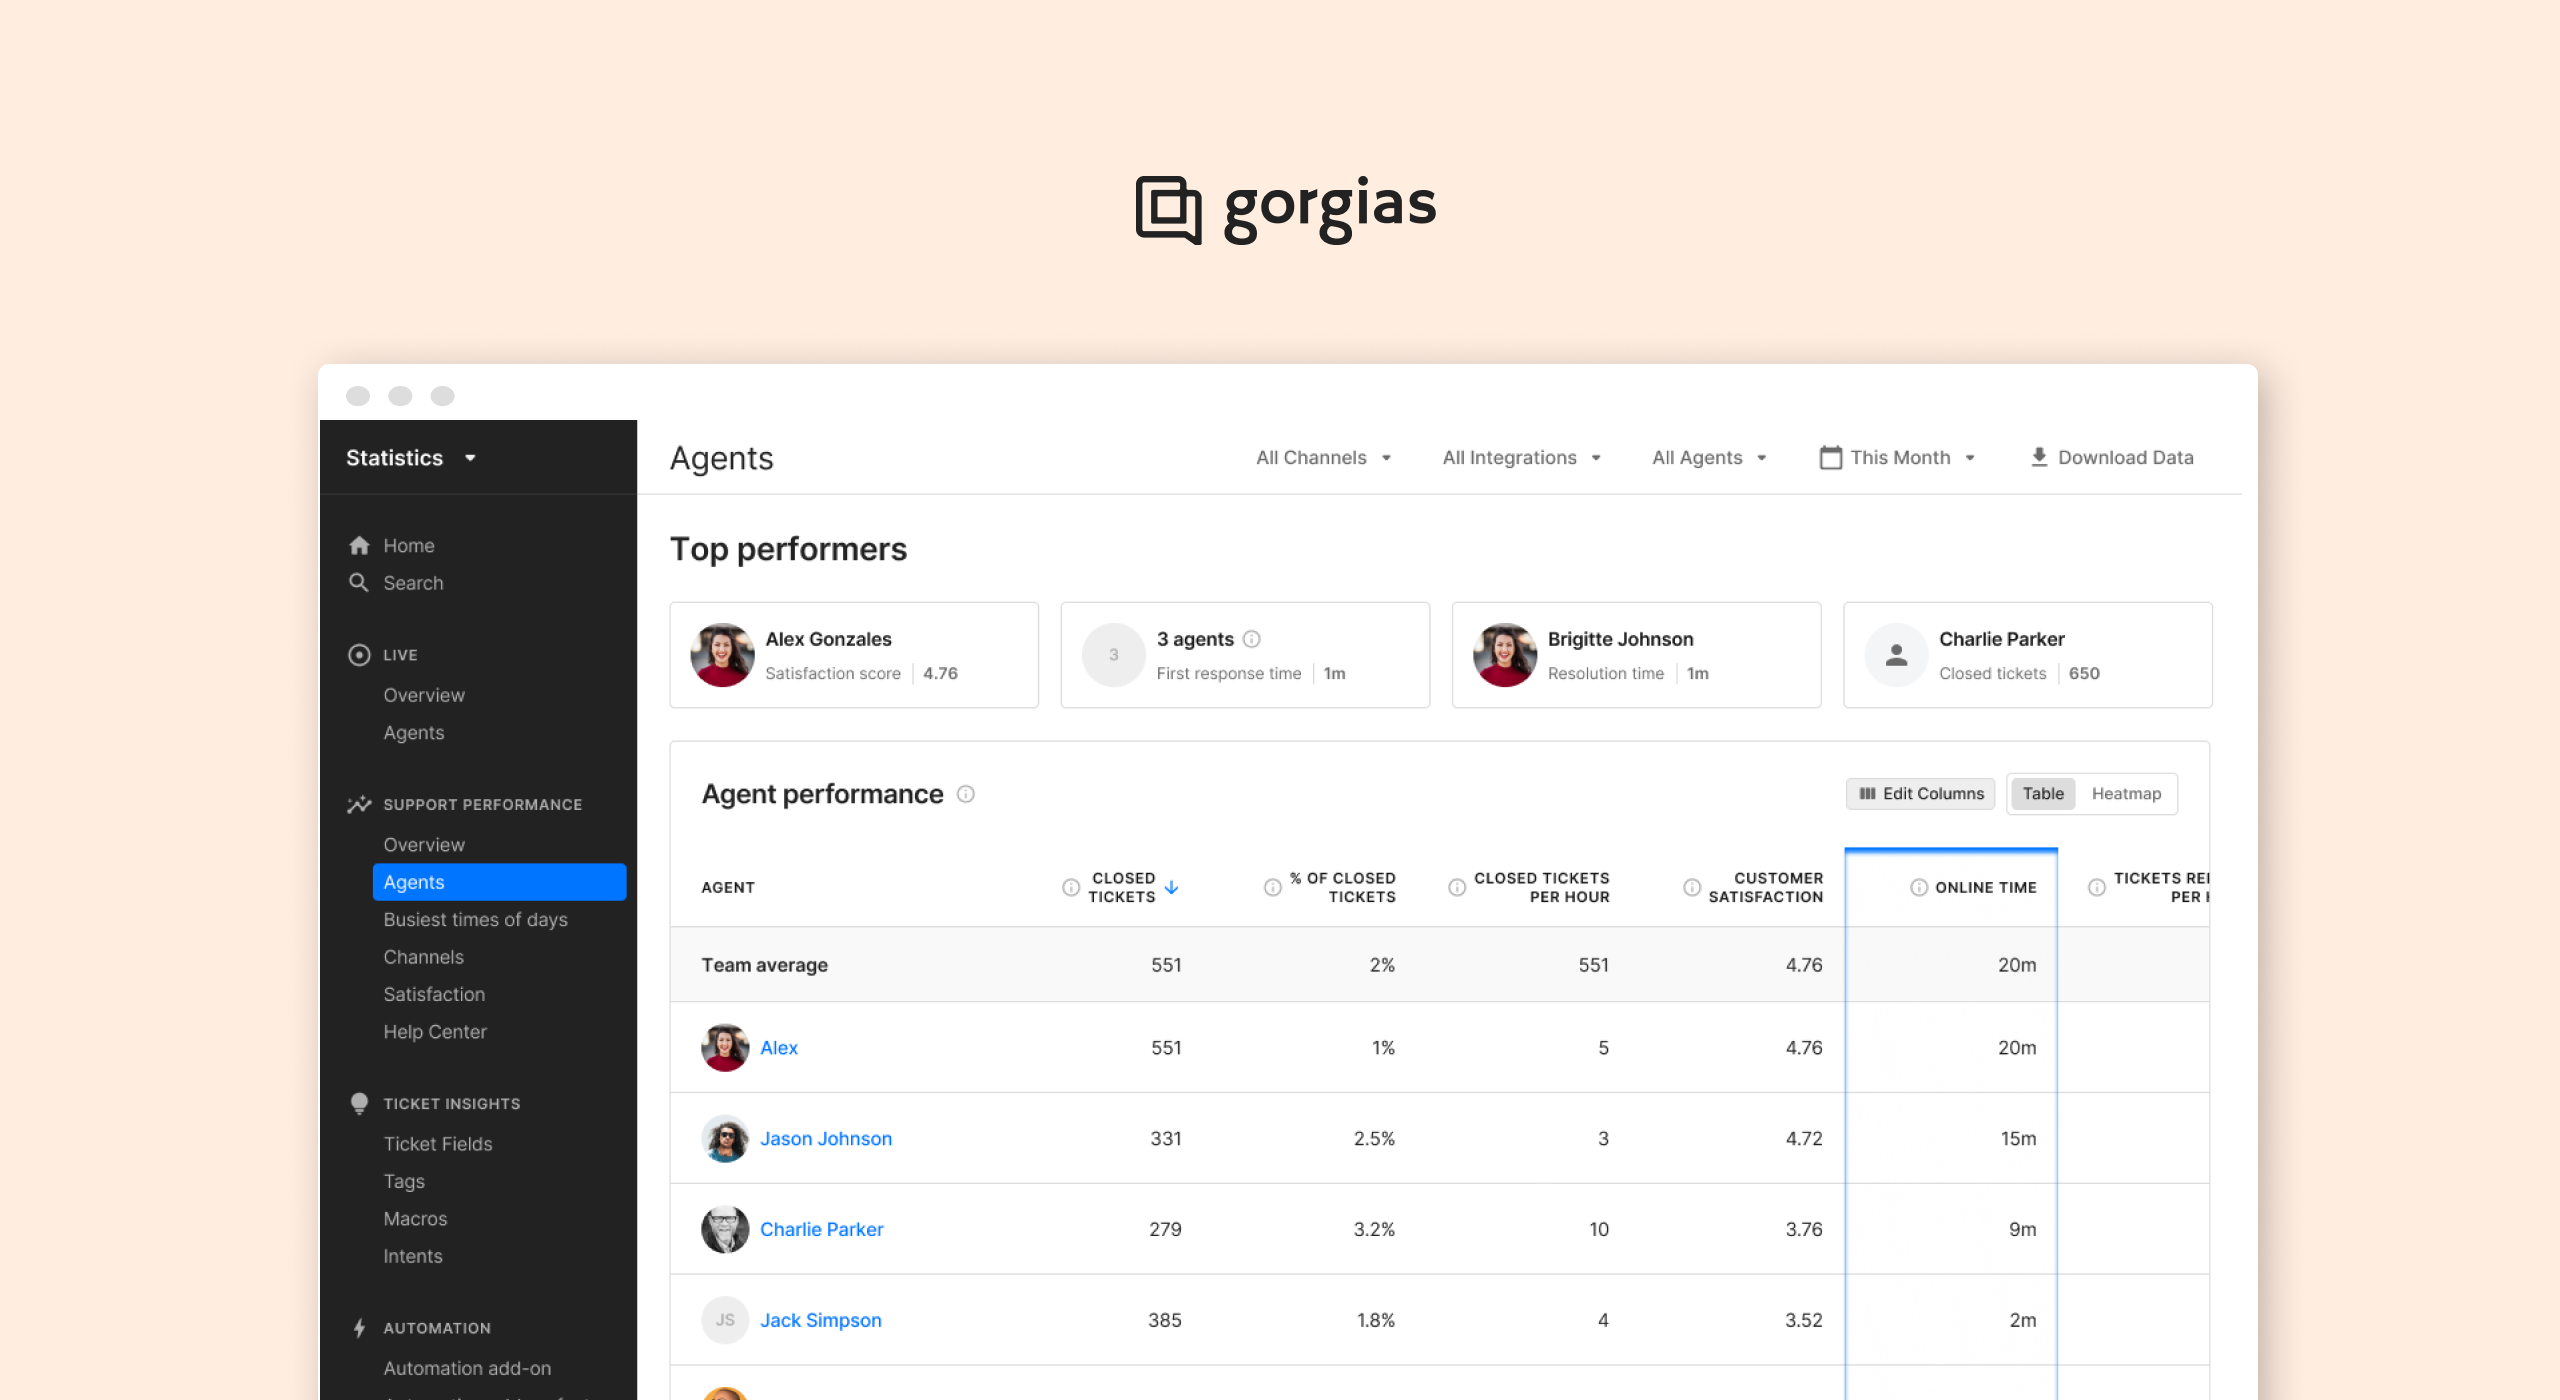
This metric is in the Agents report; online time has been removed from the Live Agents report.
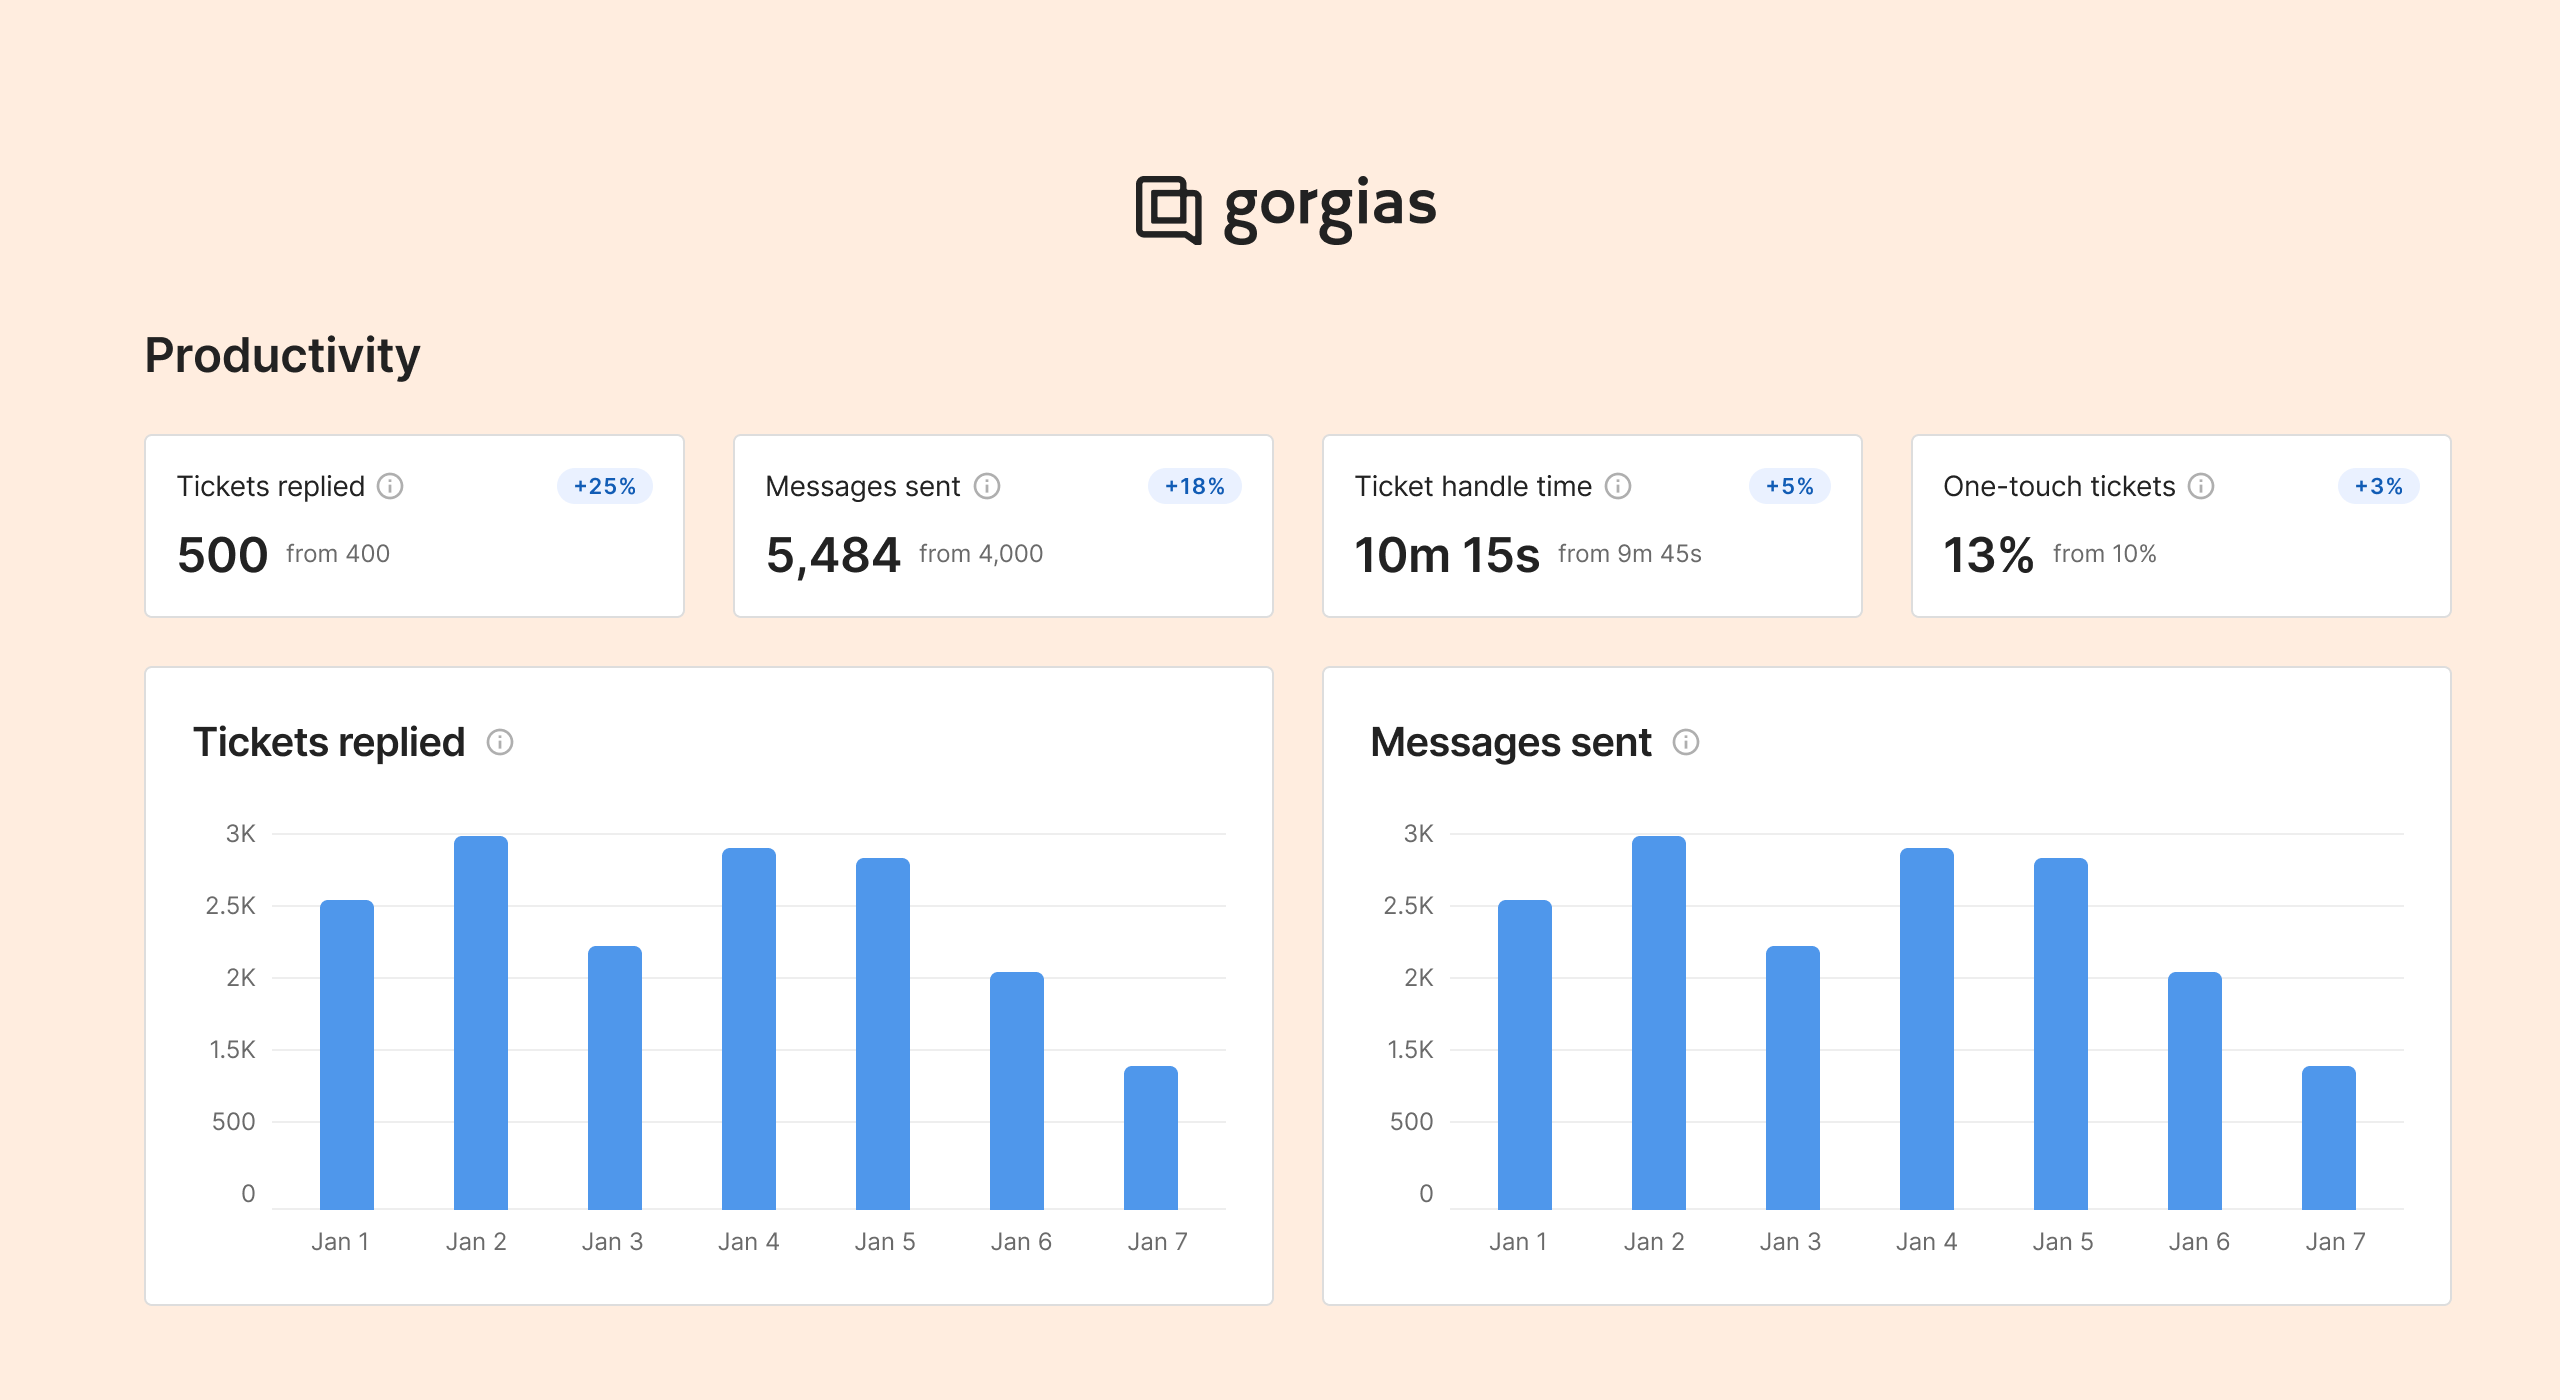
Productivity metrics
To help you assess your agents’ productivity, we have also precomputed 3 metrics for you:
Closed tickets per hour: Number of closed tickets divided by Online Time
Tickets replied per hour: Number of tickets replied divided by Online Time
Messages sent per hour: Number of messages sent divided by Online Time
All 3 metrics can be found in the Agents report.
Note: The new metrics commenced tracking on March 19th, 2024, with no data accessible prior to that date.
The Legacy Overview will be deprecated at the end of June 2024
This only concerns customers who joined before August 2023 and had access to the legacy overview. The legacy Overview will be deprecated by the end of June 2024. It will still be accessible at the bottom of this page until then.
You can check out our help documentation here and explore how the metrics are calculated.
]]>Support Performance Overview Report
Ticket Handle Time
Ticket Handle Time (THT), also known as Average Handle Time (AHT), is a vital metric that measures the average time your agents spend resolving a ticket. This metric provides valuable insights into your agents' efficiency and enables you to effectively forecast the necessary agent count to manage your ticket volume. Analyzing Ticket Handle Time allows you to optimize operational efficiency, enhance response times, and deliver exceptional customer experiences.
You can find these metrics both in the Support Performance Overview and the Agents reports.
Support Performance Agents report
Online Time
Exciting news! We've revamped the way we track the time spent by agents in Gorgias. While this metric was previously available only in the Live Agents report and couldn't be analyzed over different periods. However, it's now been completely reworked for better accuracy. This enhancement empowers you to assess your agents' performance more effectively over time.
This metric is in the Agents report; online time has been removed from the Live Agents report.
Productivity metrics
To help you assess your agents’ productivity, we have also precomputed 3 metrics for you:
Closed tickets per hour: Number of closed tickets divided by Online Time
Tickets replied per hour: Number of tickets replied divided by Online Time
Messages sent per hour: Number of messages sent divided by Online Time
All 3 metrics can be found in the Agents report.
Note: The new metrics commenced tracking on March 19th, 2024, with no data accessible prior to that date.
The Legacy Overview will be deprecated at the end of June 2024
This only concerns customers who joined before August 2023 and had access to the legacy overview. The legacy Overview will be deprecated by the end of June 2024. It will still be accessible at the bottom of this page until then.
You can check out our help documentation here and explore how the metrics are calculated.
]]>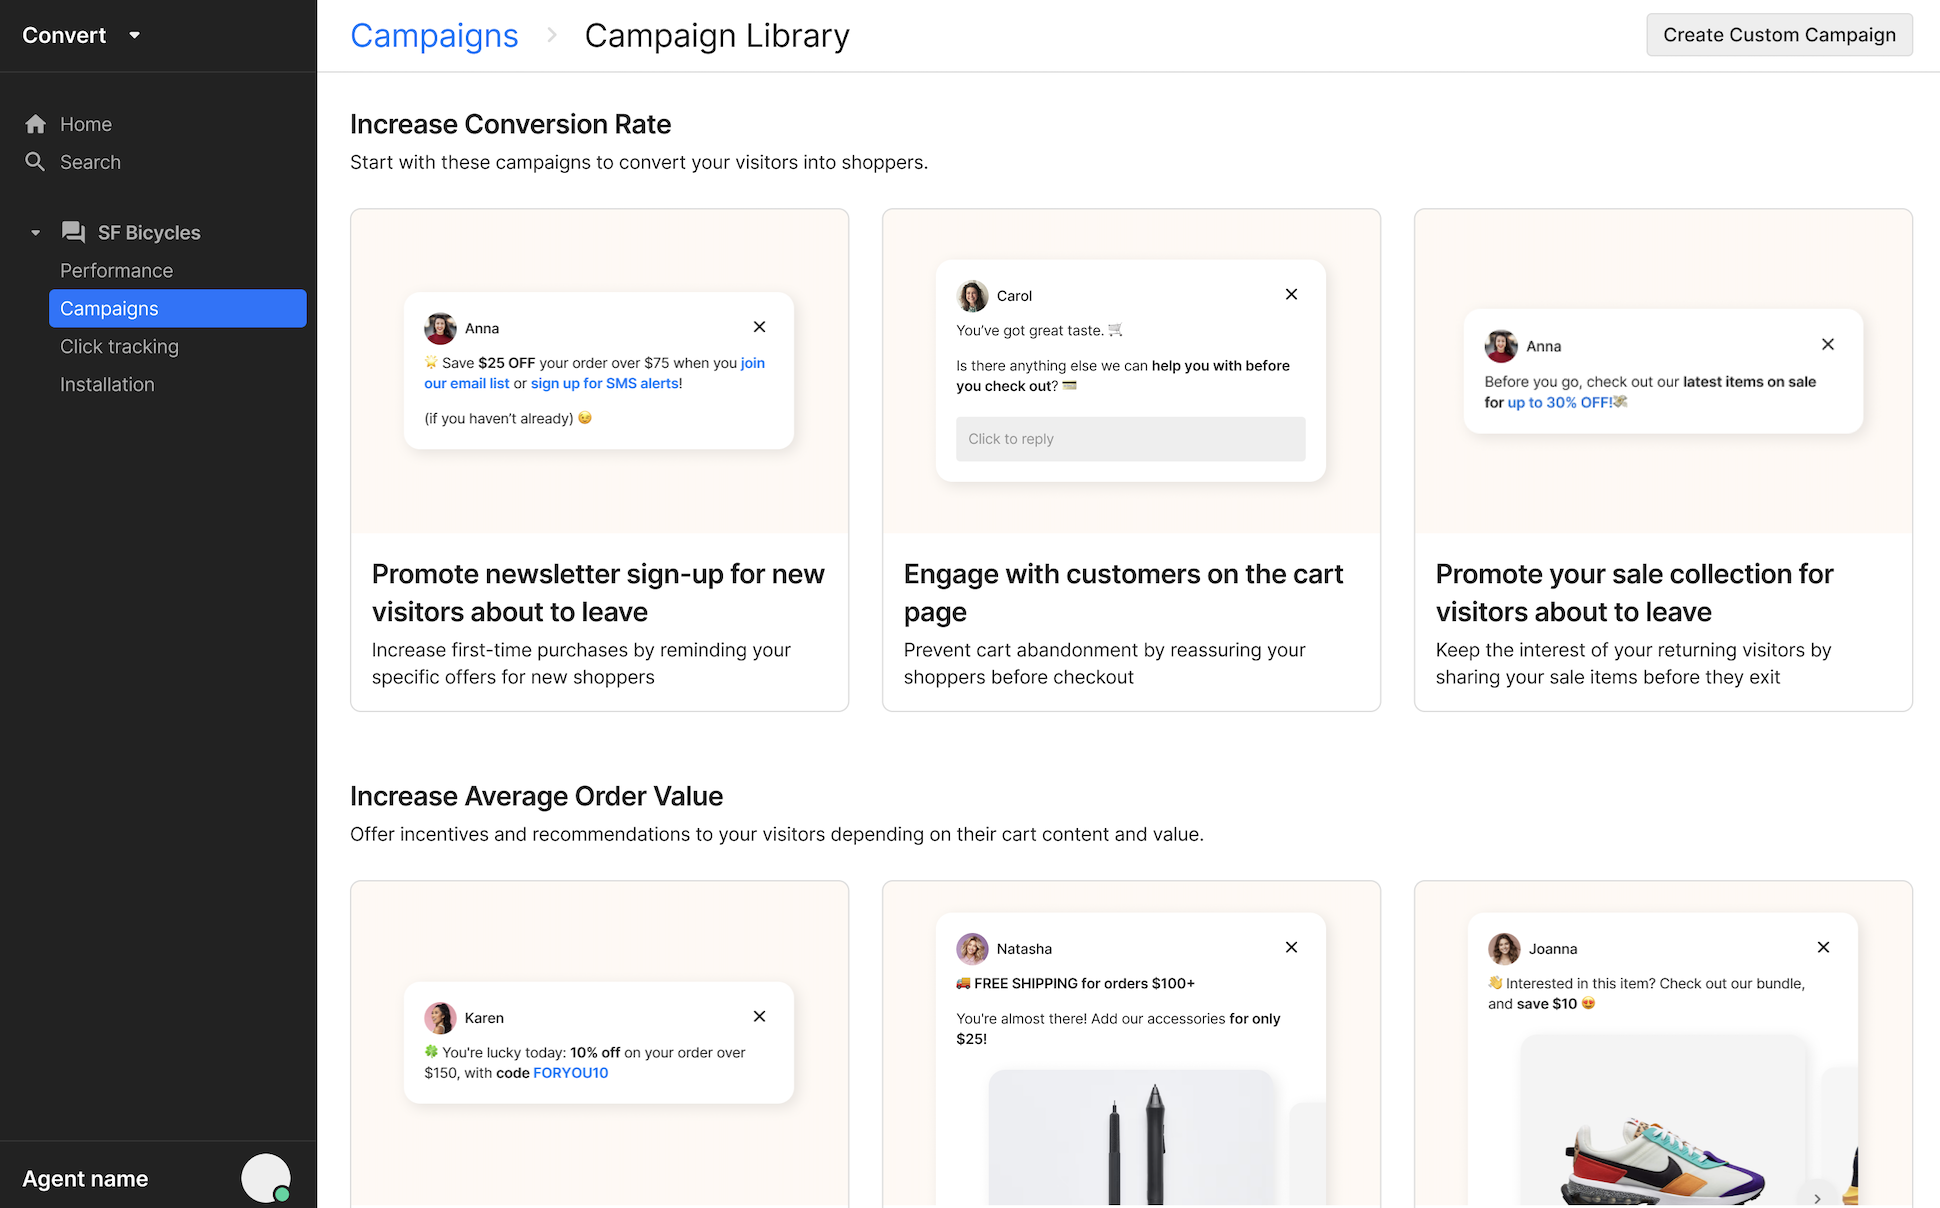
We're excited to announce the release of Campaigns Library!
Convert Subscribers now have direct access to our most successful campaign templates, directly integrated into the campaign creation flow.
Now, creating impactful campaigns has never been simpler. With just a few clicks, you can tap into the strategies that have proven to be highly effective, saving you time and effort while maximizing your results.
]]>We're excited to announce the release of Campaigns Library!
Convert Subscribers now have direct access to our most successful campaign templates, directly integrated into the campaign creation flow.
Now, creating impactful campaigns has never been simpler. With just a few clicks, you can tap into the strategies that have proven to be highly effective, saving you time and effort while maximizing your results.
]]>
We're excited to announce the release of Tickets auto-merge, a powerful addition to our support suite designed to streamline ticket management and enhance customer experience.
With automated ticket merging, agents now enjoy consolidated information in a single ticket, leading to quicker response times and improved workflow efficiency. This enhancement minimizes manual effort, empowering agents to deliver swift and effective support to our valued customers.
You can find this setting option by going to Settings > Productivity > Auto-merge.
Want to exclude certain tickets from auto-merge? Simply create a Rule to specify which tickets you want the auto-merge service to ignore and use the new “Exclude ticket from auto-merge” action.
Read more about auto-merge.
]]>We're excited to announce the release of Tickets auto-merge, a powerful addition to our support suite designed to streamline ticket management and enhance customer experience.
With automated ticket merging, agents now enjoy consolidated information in a single ticket, leading to quicker response times and improved workflow efficiency. This enhancement minimizes manual effort, empowering agents to deliver swift and effective support to our valued customers.
You can find this setting option by going to Settings > Productivity > Auto-merge.
Want to exclude certain tickets from auto-merge? Simply create a Rule to specify which tickets you want the auto-merge service to ignore and use the new “Exclude ticket from auto-merge” action.
Read more about auto-merge.
]]>